Showing posts with label Parties. Show all posts

Tuesday, August 9, 2011

Summer Berry Cones


These summer berry cones were one of my favorite looking dishes at Matilda's "Tea for 2" party!  Not only were they tasty, but they were just so pretty that they made a wonderful centerpiece on our buffet table.


I had seen this idea on Pinterest to serve fruit salad inside waffle cones and I just thought it was brilliant!  Have I mentioned how much I L.O.V.E. Pinterest?  It is such amazing daily inspiration.  You can see some of my pins HERE.  I loved the idea of fruit salad, but I wanted to do something that represented Matilda and she loves berries, so I went with a berry salad instead.


With my style of entertaining, I like to have most of my food prepped ahead of time, but this was one dish we saved for the last minute.  Berries can start to go bad pretty soon after they are washed.  So we waited until about an hour before the party to wash and dry the berries.  We wanted to make sure that the berries were thoroughly dried, otherwise they would have made the cones soggy.


We went with strawberries, blueberries and blackberries.  I thought about raspberries, but sometimes those can get smashed pretty easily, so I left them out.  Also, we are lucky that Matilda's birthday falls right during berry season.  I think if it were another time of year we would have done a different fruit because berries can be really pricey out of season.


I also toyed with the idea of dipping the tops of the cones in chocolate, but with it being in the 80's, I was worried they might melt and be messy.  I still think I might do that for an indoor or fall party!

Wednesday, August 3, 2011

Crepe Paper Flowers


The crepe paper flowers that I made for Matilda's "Tea for 2" party were really simple to make and incredibly inexpensive.  I bought three rolls of different colored crepe paper and was able to make about 10 different flowers and a ton of ruffled streamers (and I still had some left over).  At $1.00 per roll, I would definitely say this was budget decorating.

Here's how to make your own crepe paper flowers........

Supplies:
3 rolls crepe paper (different colors)
Tape
Sewing machine

Directions: 


Grab your three rolls of crepe paper.   I chose two different shades of pink and yellow.  I purchased these at Walmart for $1.00 per roll and they coordinated with the napkins and plates as well.


Place your three different colored crepe papers on top of one another.


Set your sewing machine to the longest stitch length (mine is 5.0) and run a straight, gathering stitch along one of the edges of your crepe paper.  Do not back-stitch at the beginning or the end of your stitching or you will not be able to gather your crepe paper.

The length of crepe paper you cut is really up to you.  The longer the crepe paper length, the larger your flowers will be.  I used many different lengths for a variety of sizes, but you could do them all uniformly as well.  You might test one out first to see how long you want your crepe paper.


Pull one of the threads and begin to gather your crepe paper.  This will take a little effort, but keep pulling and sliding the gathers until you have successfully gathered the entire length of your crepe paper.


Here is what your crepe paper will look like after gathering.  You can see that it already starts to form the shape of a flower.


Work your crepe paper around in a circle and tape the back with clear tape to secure in place.


Above is your crepe paper flower before you fluff it out.  To fluff it, just seperate each layer of crepe paper from the other until you've achieved your desired look.


And when you have successfully fluffed your flower, you will have a gorgeous, full-looking crepe paper flower to use for your next party.  Try making these in a variety of colors and sizes to coordinate with any party theme.  These would also be really great for a baby or bridal shower as well!

Monday, July 25, 2011

Governor's Mansion Summer Peach Tea Punch


Several months prior to Matilda's "Tea for 2" party, I received an issue of Southern Living magazine that was totally dedicated to different types of sweet teas.  I thought, "Perfect!", it was just what I needed for my little lady's party.  I decided on "Governor's Mansion Summer Peach Tea Punch" and I was not disappointed!

This tea punch is a combination of peach nectar, iced tea, simple syrup, ginger ale, club soda and more!  It's a great way to add some festiveness to your basic iced tea and really take things to another level!

Makes 1 gallon
Recipe from Southern Living Magazine
Ingredients: 
3 family-size tea bags 
2 cups loosely packed fresh mint leaves 
1 (33.8-oz.) bottle peach nectar 
1/2 (12-oz.) can frozen lemonade concentrate, thawed 
1/2 cup Simple Sugar Syrup 
1 (1-liter) bottle ginger ale, chilled 
1 (1-liter) bottle club soda, chilled 
Garnish: fresh peach wedges

Directions: 
Bring 4 cups water to a boil in a medium saucepan; add tea bags and mint leaves. Boil 1 minute; remove from heat. Cover and steep 10 minutes.

Discard tea bags and mint. Pour into a 1-gal. container; add peach nectar, lemonade concentrate, and Simple Sugar Syrup. Cover and chill 8 to 24 hours.


Pour chilled tea mixture into a punch bowl or pitcher. Stir in ginger ale and club soda just before serving.  Garnish with fresh, sliced peaches.


We served our Summer Peach Tea Punch in mason jars with straws, but it would also be beautiful in a wine glass or champagne flute.  This iced tea is perfect for a warm summer day or a "Tea for 2" party!

Friday, July 22, 2011

Lemon Lavender Tea Cookies


My mom and her husband, Allen (aka Pepo), recently attended the Lavender Festival in Blanco, Texas and they sent me this wonderful lavender cookbook and culinary grade lavender.  I had no idea there were so many ways to cook with lavender.  I thought these Lemon Lavender Tea Cookies would be just perfect for Matilda's "Tea for 2" party and they definitely were just right!

These cookies are light and contain absolutely no eggs, so they are definitely more of a shortbread.  Be careful though, because the dough tasted so yummy that I'm surprised I even got some cookies out for the party!

Makes 24 cookies
From the "Local Flavor of Lavender" cookbook
Ingredients:
1 tablespoon dried culinary lavender
2 cups all purpose flour
1/8 teaspoon salt
1 cup unsalted butter (room temperature)
2/3 cup sugar
Zest of one lemon
1 teaspoon vanilla
1 tablespoon milk

Directions:
Preheat oven to 325 degrees.


You will need to use dried culinary grade lavender for this recipe since that is what is suitable for human consumption.  Above is the lavender that was sent to me by my mom from the festival.


Finely chop 1 tablespoon of lavender.  If you have a coffee grinder used for grinding herbs, that would be a great thing to use or you could also use a food processor.  I opted for a basic knife.


Zest one lemon.  I like to use my microplane for zesting, but a box grater would work just as well.  Make sure you only zest the yellow part of the lemon.  The white can be pretty bitter.

Cream wet ingredients, lemon zest and sugar with a hand-mixer.  Then add in dry ingredients.  Stir until dough comes together.  It should not be dry, but not too sticky either.  If you think it is too dry, keep stirring, it will come together.


Place dough in refrigerator for 1-2 hours, until firm, or overnight.  Remove from refrigerator one hour before rolling out dough.  The next part is up to you.  You can make these like regular cookie cutter cookies and roll your dough 1/4" thickness and cut with a round or heart shaped cookie cutter.  Or you can do what we did, which was to roll the dough into two logs and slice the cookies, then coat them in sugar.  Either way, they will turn out great.

Bake for 15-20 minutes or until cookies are slightly brown on the edges.  Transfer cookies to a cooling rack and let cool completely.


The dough can be made up to two days in advance and cookies can be baked one day in advance.  Freeze any leftover cookies for a sweet treat on another day!  These cookies will have your guests talking because they are delicious and a unique flavor.

The next time you have the ladies for tea or coffee, give these a try, they will love them, that is, if you don't eat all the dough first!

Wednesday, July 20, 2011

Goat Cheese and Ham Wrapped Asparagus


These Goat Cheese and Ham Wrapped Asparagus were a huge hit at Matilda's "Tea for 2" party.  And surprisingly it was the men who really gobbled these up!  They are a great finger food because they don't require a fork and are easy to pick up and eat while you socialize.

Serves 15-20
Ingredients:
2 lbs. fresh asparagus
1/2 lb. honey ham
8 oz. herb goat cheese
1/3 brick cream cheese, softened
30+ fresh chives 


Cut off the tough ends of the asparagus (approximately 1"- 2"). Cook asparagus.  Only cook for a few minutes in boiling water and then shock them in a large bowl of ice water.  You do not want to over-cook the asparagus because they will lose their beautiful green color.  You also still want them to have a good bite and not be flimsy.  I'd say, in this case, better to under-cook than over-cook.


Clean your fresh chives.  We picked these from our herb garden so they are super long.  You will need one chive per asparagus spear.


Combine your herb goat cheese and the 1/3 block cream cheese.  The cream cheese will help the goat cheese be easier to work with when spreading it on the pieces of ham.


Cut ham in half or thirds (we did thirds because our ham slices were very large).  Spread a very thin layer of goat cheese on each piece of ham.  Roll up asparagus in ham/goat cheese.  Tie with a chive to secure.  Place in a container to keep cool in the refrigerator.  Can be made a day in advance.


Remove from refrigerator just prior to serving.  Place on a serving tray.  I love using white because I think it makes the colors pop, but you can use whatever you'd like.


I would suggest discarding any un-eaten asparagus after the party if it has been sitting out for several hours.  These asparagus were eaten up SO quickly. I would recommend making more than you need and maybe bringing them out in two rounds so they don't spoil. 

Give this recipe a try - you're going to love it!

Tuesday, July 19, 2011

Summer Pasta Salad


I love a good pasta salad, don't you?  I've tried tons of different recipes and I don't know if I've ever met a pasta salad that I didn't really like.  For Matilda's "Tea for 2" party I wanted to do an updated version of a traditional classic.  This is my version of Summer Pasta Salad with fresh herbs, sun dried tomatoes, peas, black olives and asparagus.

Serves 15-20
Ingredients:
2 lbs. tri-color rotini pasta
1 cup zesty Italian dressing
1 cup Caesar dressing
1/2 jar of sun dried tomatoes packed in olive oil
10 fresh chives
Handful of fresh parsley
1/2 cup fresh basil
2 small cans sliced black olives
Half bag of frozen peas, thawed (run under hot water)
10 cooked asparagus spears, cut into 1" pieces

Directions:

Cook pasta according to package directions.  Once cooking is complete, rinse thoroughly under cold water to remove starch and set aside.


While pasta is cooking, make your dressing for the pasta salad.  Combine both dressings, sun dried tomatoes (with some of the olive oil), and all the fresh herbs.  Place in a blender and puree until dressing comes together.  Feel free to add any additional fresh herbs that your family loves.


Pour dressing into a large mixing bowl.  Combine pasta, olives, peas, asparagus, and dressing until pasta is fully coated.  Place in refrigerator to cool.  Remove from refrigerator 1 hour prior to serving and stir.  Can be made up to two days ahead of time.


 Garnish with fresh parsley or any other herbs.  We just happen to have a lot of parsley in our garden this year so that's what I chose to use.  My Grandma Marge always taught us to never serve a dish without a garnish.  I think she would be proud.


This is a wonderful dish for entertaining because it can be made up to two days in advance and only continues to get better the longer it sits.  You can add any vegetables that are in season or that your family enjoys.  I think this would be amazing with some grilled zucchini or roasted bell peppers.  Just make the dressing and see what you happen to have on hand - you can't really go wrong!

Monday, July 18, 2011

{ Tea for 2 Birthday Party }


About a week ago we celebrated Miss Matilda's 2nd birthday with a "Tea for 2" party.  I got the idea for this party about six months ago.  Matilda loves playing with her tea set and I thought this would make for a lovely party theme outdoors.  We really lucked out with the most gorgeous day!  It was sunny, low 80's, very little humidity - perfect for an outdoor tea! 

 Matilda's Squinty Little Smile

Matilda had a great time at her party!  She ate lots, played with her balloons and bouncy balls, and had a lot of fun opening presents and eating cake.  She kept saying "Happy Day", "Happy Day"!!  She really understood this year that the party was all about her and she enjoyed every minute of it.


The party was inspired by the gorgeous Anna Griffin fabric that I recently purchased.  I just loved the yellows and pinks which made me instantly think of little Matilda.  I created her birthday dress from one of my own patterns that will be coming out later this year - the "I'm a little teapot dress".  You can read more about her birthday dress here.

We had about 35 close family and friends attend the party.  At age 2, the party is as much for the adults as it is the children so I made sure to have a mix of food and beverages for all ages.


I set up a little area for the kids.  I brought out the girls small table and covered the chairs with vintage pillowcases.  Then I draped some vintage linens over the top of the table (which I taped underneath so they wouldn't move around).  I also put out two large quilts and the girls upholstered sitting chair for an area to open presents and for the little babies to hang out.  We brought out lots of the girls stuffed animals and baby dolls to play with as well.

For the adults we brought out the furniture that is in our sunroom, but for some reason I didn't snap a picture of that area.  It was a settee and three sitting chairs.  We brought out some side tables to have areas to set down drinks as well as a few white Adirondack chairs.


The main tent is where we kept all the food and most of the beverages.  Luckily our yard is pretty shady with all the trees, but this just kept any extra sun from making the food too warm.  Thank goodness there were no bugs out this day either!

I served lots of tasty treats at Matilda's "Tea for 2" party.  I just love menu planning and cooking food for parties - so much fun!

Asparagus wrapped with herb goat cheese, ham, and tied with a fresh chive.

Summer Pasta Salad with homemade sun dried tomato dressing, olives, peas and asparagus.

Summer Berry Salad served in waffle cones.

Lemon Lavender Shortbread Tea Cookies

Tea Sandwiches - Chicken Walnut Salad, Cucumber with Chive Cream Cheese, and PB&J.

 Brownie Bites, Coconut Macaroons, Apricot and Raspberry Shortbread Cookies

 Lemon Cranberry Scones

 Palmiers (aka Elephant Ear Cookies)

Old Fashioned Store-bought Wafer Cookies

Beverages are a big part of our events, so we made sure to have plenty on hand.  We had iced tea (can't have a tea party without tea, right?), a variety of wine, sparkling lemonades, sodas, water, and my husband's home-brewed beer.

Governor's Mansion Summer Peach Tea Punch


The tea and beverages were served in canning jars.  Mason jars are my favorite drinking glass of choice - we had two different sizes and the small ones were just right for little hands.  I also tied the little ones with some pink tulle for added color.


Like I said above, when your kiddos are little, the parties are just as much for the parents as the little ones.  For each of the girls birthday bashes my husband has made a variety of beers for the adult guests.  This year was no exception.  The main theme beer was the "Peach Mango Tea" beer, but we also had several other varieties on tap.  He always makes these cute little labels for each beer......my favorite label was the "Pigtail Pale".  I didn't get to taste any of the beer this year, but maybe next year!


The long folding table was decorated with a basic tablecloth and then I layered some vintage linens on the top which included a small tablecloth and napkins.


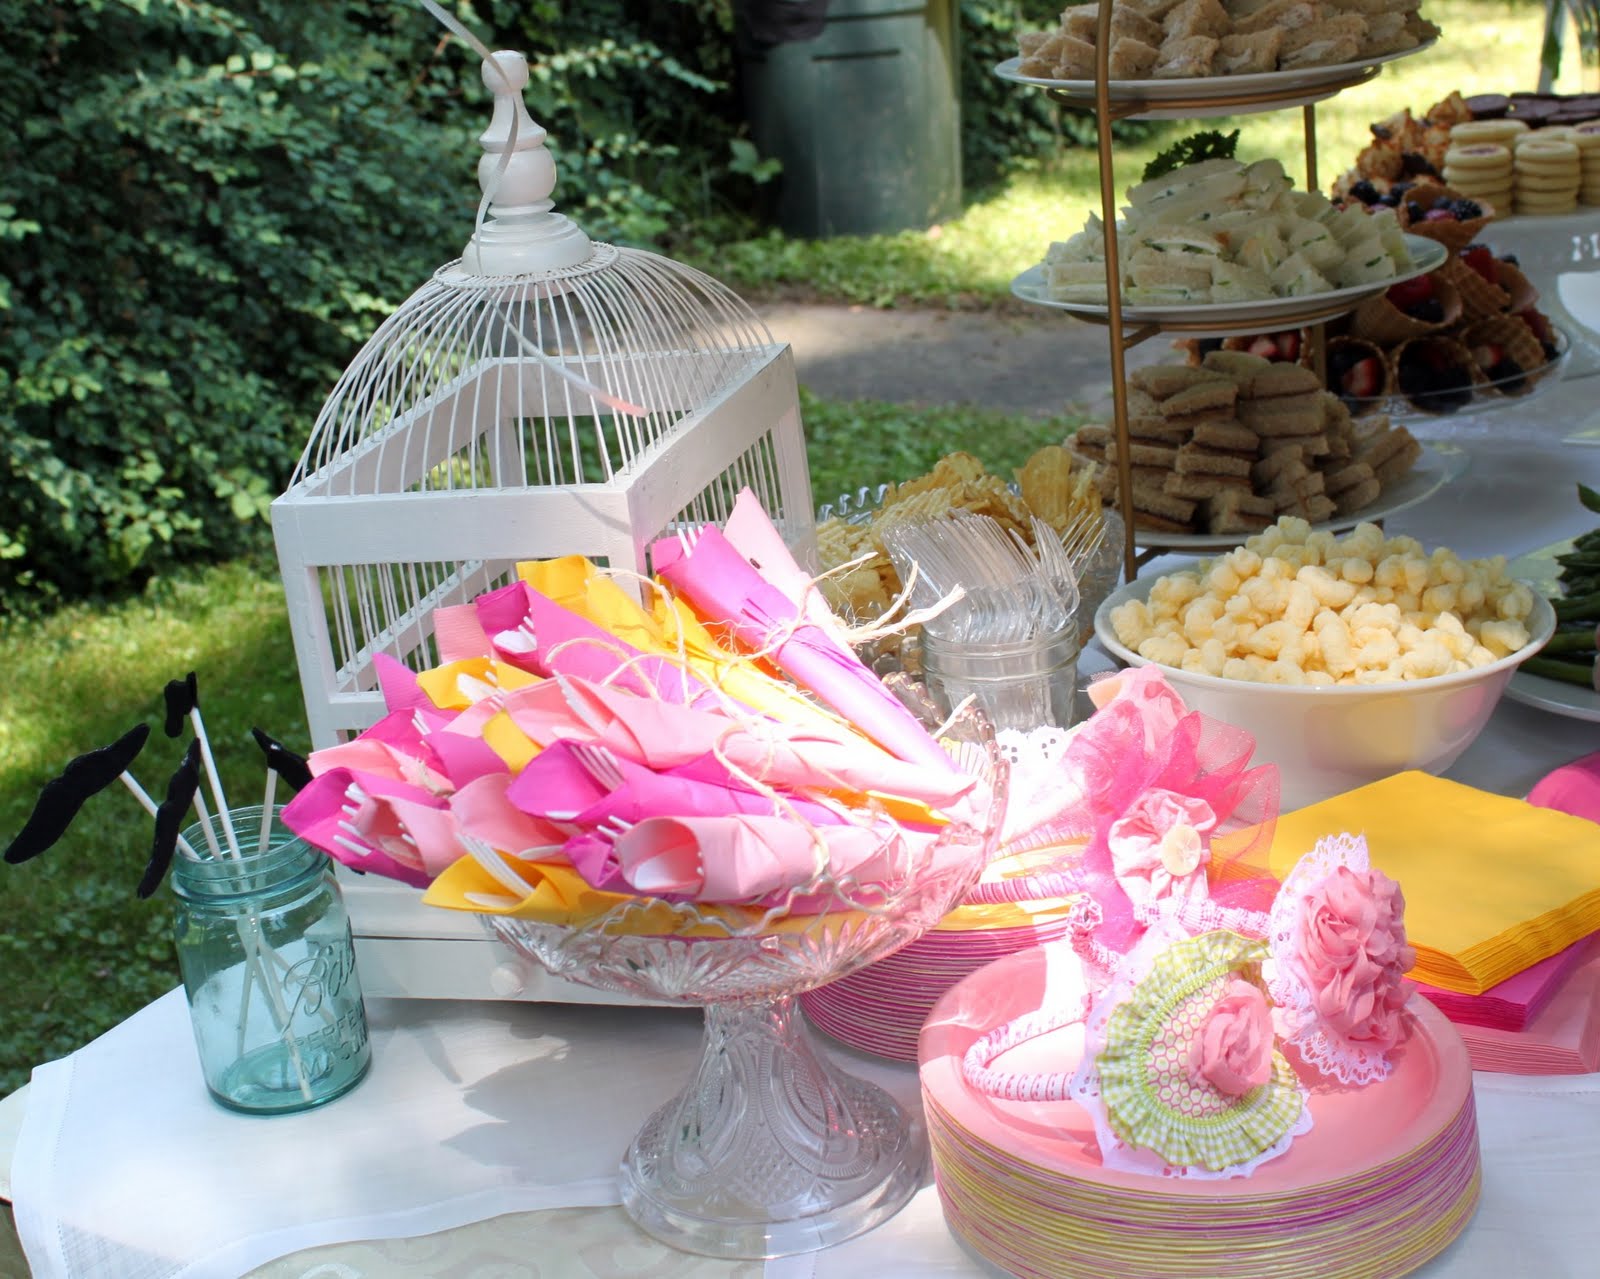
I wrapped the silverware in napkins with some twine.  I used light pink, bright pink and yellow napkins.  The plates coordinated with the napkins and I put out additional forks in a canning jar.


I made a banner from doilies that I cut in half and stitched onto a pale pink ribbon (tutorial to come).  I also took some basic paper streamers and ruffled them with a gathering stitch on my sewing machine and I turned several of them into flowers as well.


In the picture above you can see the paper flowers.  I placed these in several different places as well as in two white bird cages that we used for decoration.


I made some fun, pretty headbands for the little girls to play with at the party.  Here are a couple of the cuties wearing them.........


And for the boys, I made these funny little man mustaches..........


Matilda waited very patiently to open her presents.  Actually she was a very patient little lady all day long.  I was very impressed, especially because it was a "no nap" day for her (which could be disastrous).


Big sister, Savannah, got in on the present action too, but did a very good job just "helping" rather than taking over.


We gave out simple party favors of side-walk chalk for the children that attended the party.


I printed this nice saying on our computer and then taped them to each little box of chalk.  Each box was tied with pink tulle.

In life you need these things.........
 Tea,
Chocolate,
And friends to share them with. 

Thanks for coming to my Tea for 2 party.
Love, Matilda Jane

And finally, the cake.  I bet you've never seen one like this before.......it's kind of a funny story.


At first Savannah told me that Matilda wanted a cake for her birthday, then she decided that she wanted cupcakes (mind you, this was NOT Savannah's party).  And finally she settled on the fact that Matilda wanted a cake with cupcakes on top.  It's all she could talk about.  I told her that it was Matilda's birthday so we would let her decide what she wanted.  Savannah said, "Matilda, do you want a cake with cupcakes on top?" and Matilda said "yeah!!!".  Savannah said, "See Mommy, that's what she wants!".

So, though I would have loved to do a little tea pot cake or something a little more elegant, sometimes you just have to make your children's dreams come true.  We purchased a large sheet cake with no writing on top.  Then I took the wrappers off of 18 cupcakes and placed them on top.  We sprinkled the top of the cake with thick, white sugar and fine, pink sugar.  Savannah loved helping me with this and was tickled pink to finally have a cake with cupcakes on top.

To be honest, it made for very easy serving.  We gave each of the kids a cupcake straight off the top of the cake and cut the rest of the cake for the adults.  I think Savannah may be on to something with this idea!

All and all we had a great time at Matilda's birthday party and couldn't have asked for a more beautiful day!  Good food, good drinks and great family and friends.  The girls were wiped out by the end of the day and tucked into bed by 6:00!!  

And again, Happy Birthday to my little baby girl!

I'll be sharing recipes and a few decorating ideas from the party over the next couple weeks, so stay tuned for some yummy recipes to come!