Showing posts with label Sides Dishes. Show all posts

Tuesday, August 9, 2011

Summer Berry Cones


These summer berry cones were one of my favorite looking dishes at Matilda's "Tea for 2" party!  Not only were they tasty, but they were just so pretty that they made a wonderful centerpiece on our buffet table.


I had seen this idea on Pinterest to serve fruit salad inside waffle cones and I just thought it was brilliant!  Have I mentioned how much I L.O.V.E. Pinterest?  It is such amazing daily inspiration.  You can see some of my pins HERE.  I loved the idea of fruit salad, but I wanted to do something that represented Matilda and she loves berries, so I went with a berry salad instead.


With my style of entertaining, I like to have most of my food prepped ahead of time, but this was one dish we saved for the last minute.  Berries can start to go bad pretty soon after they are washed.  So we waited until about an hour before the party to wash and dry the berries.  We wanted to make sure that the berries were thoroughly dried, otherwise they would have made the cones soggy.


We went with strawberries, blueberries and blackberries.  I thought about raspberries, but sometimes those can get smashed pretty easily, so I left them out.  Also, we are lucky that Matilda's birthday falls right during berry season.  I think if it were another time of year we would have done a different fruit because berries can be really pricey out of season.


I also toyed with the idea of dipping the tops of the cones in chocolate, but with it being in the 80's, I was worried they might melt and be messy.  I still think I might do that for an indoor or fall party!

Tuesday, July 19, 2011

Summer Pasta Salad


I love a good pasta salad, don't you?  I've tried tons of different recipes and I don't know if I've ever met a pasta salad that I didn't really like.  For Matilda's "Tea for 2" party I wanted to do an updated version of a traditional classic.  This is my version of Summer Pasta Salad with fresh herbs, sun dried tomatoes, peas, black olives and asparagus.

Serves 15-20
Ingredients:
2 lbs. tri-color rotini pasta
1 cup zesty Italian dressing
1 cup Caesar dressing
1/2 jar of sun dried tomatoes packed in olive oil
10 fresh chives
Handful of fresh parsley
1/2 cup fresh basil
2 small cans sliced black olives
Half bag of frozen peas, thawed (run under hot water)
10 cooked asparagus spears, cut into 1" pieces

Directions:

Cook pasta according to package directions.  Once cooking is complete, rinse thoroughly under cold water to remove starch and set aside.


While pasta is cooking, make your dressing for the pasta salad.  Combine both dressings, sun dried tomatoes (with some of the olive oil), and all the fresh herbs.  Place in a blender and puree until dressing comes together.  Feel free to add any additional fresh herbs that your family loves.


Pour dressing into a large mixing bowl.  Combine pasta, olives, peas, asparagus, and dressing until pasta is fully coated.  Place in refrigerator to cool.  Remove from refrigerator 1 hour prior to serving and stir.  Can be made up to two days ahead of time.


 Garnish with fresh parsley or any other herbs.  We just happen to have a lot of parsley in our garden this year so that's what I chose to use.  My Grandma Marge always taught us to never serve a dish without a garnish.  I think she would be proud.


This is a wonderful dish for entertaining because it can be made up to two days in advance and only continues to get better the longer it sits.  You can add any vegetables that are in season or that your family enjoys.  I think this would be amazing with some grilled zucchini or roasted bell peppers.  Just make the dressing and see what you happen to have on hand - you can't really go wrong!

Wednesday, June 15, 2011

Lemon Roasted Asparagus


Don't you just love summer?  It's that yummy time of year when all of the glorious produce comes in season.  I absolutely love visiting the farmers market and picking up produce from our local farmers.  I recently picked up some wonderful asparagus that I wanted to serve as a side dish with a meal I was preparing.  When produce is actually in season, I don't like to do too much to it in regards to flavoring and seasoning because it already tastes so good in it's pure form.

Lemon Roasted Asparagus in the perfect side-dish for any meal.  Serve it with some rice pilaf or couscous and you have a light, summer meal that won't weigh you down.

Lemon Roasted Asparagus

Ingredients:
1 lb. asparagus
2.5 lemons (slice 2 and leave the other one half for juicing)
Olive oil
Salt
Freshly ground black pepper.

Directions:
Preheat oven to 450 degrees.

Prep. your asparagus.  Wash and remove the tough ends (cut off approximately 1-2" on the non-tree-looking end).  If you like, you can reserve these for later to use in a cream of asparagus soup or another one of your favorite dishes.  Or if not, just discard.


Lay out asparagus out on a baking sheet.  Drizzle with olive oil, sprinkle with salt and freshly ground black pepper.  Squeeze the juice of half a lemon on top of asparagus, then add lemon slices.  Use your hands to toss and make sure all of the asparagus and lemons are coated nicely with the olive oil, salt and pepper.


Place in the oven for 15-20 minutes until the ends of the asparagus start to become caramelized and slightly browned.


Once asparagus are finished cooking, remove from oven and serve.  I like to serve asparagus spears piled up with several lemon slices.  My husband is not a huge veggie eater, but he loves this dish.  The acidity in the lemons really brings out the deliciously nutty flavor in the roasted asparagus.  Try this with fish, chicken or pork or you could even roast some up and add it to your favorite pasta dish!

  Happy Summer Produce Season!

Sunday, February 13, 2011

Baked Breaded Zucchini


I have had a taste for fried zucchini over the last several days, so today I tried my hand a making a baked version of this popular appetizer and I must say it was mighty good!  To be honest, I could not tell the difference between this baked version and the fried version that you would purchase in a restaurant.  I breaded these zucchini chips with panko bread crumbs which I think really added to the crunchy texture.

If you have a taste for fried zucchini, give this healthier version a try.  This is great as an appetizer or a side-dish.  Your kiddos will love these too because, who doesn't love dipping things into ranch dressing or marinara sauce? YUM!

Baked Breaded Zucchini
Serves 4

Ingredients:
1 (1 lb.) bag frozen zucchini chips (or 1 fresh zucchini)
2 cups Japanese panko bread crumbs
1/2 cup Parmesan cheese
2 eggs, beaten
1 tsp. Italian seasoning
Olive oil cooking spray

Directions:
Preheat oven to 450 degrees.
For this recipe, I opted to use frozen zucchini since fresh zucchini is not in season.  The fresh was not on sale and can be kind of expensive this time of year.  Plus, the frozen version was already cut into circles!


Thaw frozen zucchini and allow the excess water to drain out.  If you are using fresh zucchini, you can omit this and the next step, just slice your zucchini into rounds.


You really want to make sure you get all of the excess water out of your zucchini so it becomes nice a crispy in the oven.  Place the rounds on a paper towel and place a second towel on top.  Press lightly to remove excess moisture.


Now it's time for the breading.  I love to use panko bread crumbs - I think they add a crunchy texture that can't be beat.  I use Trader Joe's brand, but you can pretty much find them in all your major grocery stores these days.  They are sold in the same section as regular bread crumbs.


In one bowl, mix your panko, Parmesan and Italian seasoning.  In another bowl, beat your two eggs.  I decided not to add any additional salt because I find the Parmesan adds enough, but if you like things a little saltier, then you might add a 1/4-1/2 teaspoon.

Next, coat your zucchini chips in the egg mixture and then dip in the panko mixture.  Coat thoroughly and add to a baking sheet that has been sprayed with olive oil spray or cooking spray.  If you run out of bread crumb mixture, that's ok, just make up a little more.


I love this olive oil spray from Trader Joe's.  If you can't find this, then a regular cooking spray will do the trick.


Once all of your zucchini chips are breaded, spray the tops with olive oil spray.  Place in oven for 6 minutes, then flip zucchini and bake for another 10 minutes.


Serve with ranch dressing (my personal favorite) or marinara sauce.  Enjoy!

Cottage Mama's Note:  This same technique can be used to make eggplant Parmesan. 

Tuesday, November 30, 2010

Brown Sugar Baked Sweet Potatoes


My family did not grow up eating sweet potatoes and we definitely did not have sweet potatoes on Thanksgiving.  And quite frankly, I don't really care for them.  But as many of you know, when you get married and start a family of your own, you adapt to new traditions.  One of which, in my case, is sweet potatoes.

This past week, we spent Thanksgiving with my Mom and her new (as in just got married a week ago) hubby, Allen.  Like I said before, Mom and I don't do sweet potatoes, but we wanted to make sure we kept our guys happy so we added sweet potatoes to the menu.  Rather then doing a giant sweet potato casserole that would only be eaten by 2-3 people, we opted for another solution - Brown Sugar Baked Sweet Potatoes.  And let me tell you, these were a big hit!  If you are looking to add some sweet potatoes to your holiday entertaining menu, I highly recommend you give these a try!


Brown Sugar Baked Sweet Potatoes
Serves 4

Ingredients:
4 medium-sized sweet potatoes
4 tablespoons brown sugar
2 tablespoons butter
Cinnamon, to sprinkle
32 small marshmallows or 16 large ones cut up

Directions:


Heat oven to 400 degrees.  Place sweet potatoes in a deep baking dish and poke several holes in each one.  Place in oven and bake for 45 minutes or until tender.


Meanwhile, cut your two tablespoons of butter into four equal pieces.


Cut each sweet potato down the center (length-wise).  Be careful not to cut all the way through the potato.  Place one piece of butter inside each potato.


Next sprinkle each potato lightly with cinnamon (as much or as little as your family likes).  Then sprinkle the inside of each potato with one tablespoon of brown sugar.


If using large marshmallows, cut them into pieces.  If using mini-marshmallows, then just skip this step.


Divide marshmallows out and place 1/4 in each sweet potato.  Place sweet potatoes back in the oven and bake for 20 minutes or until tops are golden brown.


Remove sweet potatoes from oven and allow to cool slightly.  Place sweet potatoes onto serving platter and enjoy!


If your family really enjoys sweet potato casserole, they will definitely enjoy this recipe.  Try this easy recipe on a weeknight to go along with your family dinner.  Super-easy and super-delicious!

Tuesday, November 16, 2010

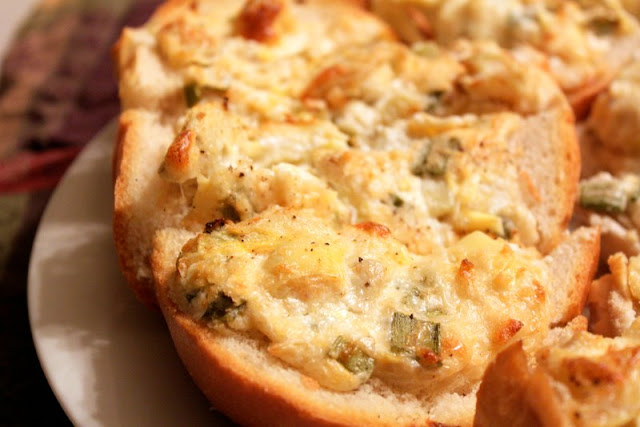
Baked Artichoke Bread


Every year my husband and I host a big fall party.  This was our sixth year hosting and we love being able to get all of our friends together and celebrate our favorite season.  We call the party "The Feast" and it is definitely just that.  We provide a large piece of meat for everyone - we've done barbecued turkey, pulled pork, tri-tip roast and this year we did a beef brisket.  My husband did a fabulous job with the brisket - maybe I can get him to "guest post" about it (wink, wink, hubby if you're reading this). 

Everyone else brings a dish to share and we have some pretty incredible cooks in our circle of friends.  There was jambalaya, white chicken chili, sweet and sour meatballs, homemade salsa and guacamole and tons of desserts - gorgeous fall leaf cookies, pumpkin pie, apple pie, sweet potato pie, chocolate dipped cheesecake and the list goes on and on. 

Even though we are in charge of the meat, I wanted to add a little something to the feast.  I had really been in the mood for some artichoke dip, so I thought that would be a good appetizer that everyone would enjoy.  I had planned to bake the dip in the oven and serve it with cut up pieces of Italian bread.  But as we were running a little short on time, I thought "why not bake the dip ON the bread?".  So that's how this recipe was born.........

Baked Artichoke Bread

Ingredients:
2 cans artichoke hearts in water
1 cup good mayonnaise
1 cup sour cream
1/2 cup Parmesan cheese (plus more for sprinkling)
4 green onions (sliced)
Salt and pepper, to taste
1-2 large loaves of Italian bread

Directions:
Preheat oven to 425 degrees.

Drain both cans of artichoke hearts and chopped them.  Mix chopped artichoke hearts, mayo, sour cream, Parmesan cheese, green onions, salt and pepper in a large mixing bowl.

Slice bread length-wise down the middle.  Place on a baking sheet.  Spread artichoke mixture all over the top of the bread.  Depending on your bread size, the mixture will cover 1-2 entire loaves.  Once mixture is spread on top of bread, sprinkle Parmesan cheese all over the top and a little freshly ground black pepper.


Place in oven and bake for 15-20 minutes or until the top is golden brown.  To serve, slice 1-2 inch thick slices.


Cottage Mama's Note:  This dish would be wonderful for holiday entertaining.  Serve it as an appetizer or as a hearty side-dish with your favorite soup.