Sunday, October 31, 2010

Sew Basics: Bias Tape (part 1)


I am so inspired by all of you that are new to sewing, getting back into sewing, or are thinking about buying a sewing machine to start sewing.  I love all the emails you have sent me and conversations we have had over on facebook.  I haven't been the most consistent with my "Sew Basics" tutorials, but I'm going to try to put more of these together in hopes that you all will get as hooked on sewing as I am.

As most of you know, I am a self-taught sewer (well, mostly).  I've had a few lessons from my Grandma and grew up with my Mom sewing (though I never showed much interest).  Bias tape was very confusing to me when I first started sewing garments.  I couldn't figure out which side was supposed to go where.  If any of you are like me, I hope this tutorial will help ease the confusion. 

Here's the plan for Sew Basics: Bias Tape

Part 1: Sewing bias tape to a garment
Part 2: Making your own bias tape from fabric

After part two, I will show you how to take your homemade bias tape and turn it into corded piping.

Let's get started........

Bias tape is a narrow piece of fabric that is cut on the bias (45 degree angle) which allows it to be stretchier and more fluid than fabric cut straight across.  Because of it's stretchiness, bias tape works great for encasing raw curved edges and giving items a finished look.


Bias tape can be purchased in the notions section of your local fabric store.  You can usually find it near the zippers and ric-rac.  These days, most bias tape comes in basic, solid colors; however, you can find vintage bias tape (see above picture) in all sorts of different fun patterns.  To customize your own bias tape, you will need to make your own (we will discuss that in part 2). 

There are two different types of bias tape that is made in varying widths - single-fold and double-fold.

Single-fold bias tape has two sides folded inwards (one fold is slightly larger than the other) and it is not folded down the center.  Double-fold bias tape is basically single-fold bias tape, but folded in half again lengthwise.  Double-fold will encase an entire raw edge with bias on either side of the raw edge.  Single-fold will allow you to fold over a raw edge to the inside of a garment to finish the edge, but generally you will not see any bias tape on the exterior of the garment.  I like to use double-fold for most things.

Here is an example of how to sew double-fold bias tape to encase an armhole on a vintage pillow case dress:


Open up your double-fold bias tape.  If you look very closely you will see that one side has a larger fold than the other.  This is a very important detail to notice before you sew on your bias tape.


Open up the fold on the smaller side. When getting ready to encase an arm hole, you want to line up the raw edge of the garment with the raw edge of the smaller fold of the bias tape.  Pin this in place on the right-side of the garment.  So as you can see above, you will need to unfold the double-fold tape quite a bit for this step to work.  The larger fold will remain folded over.


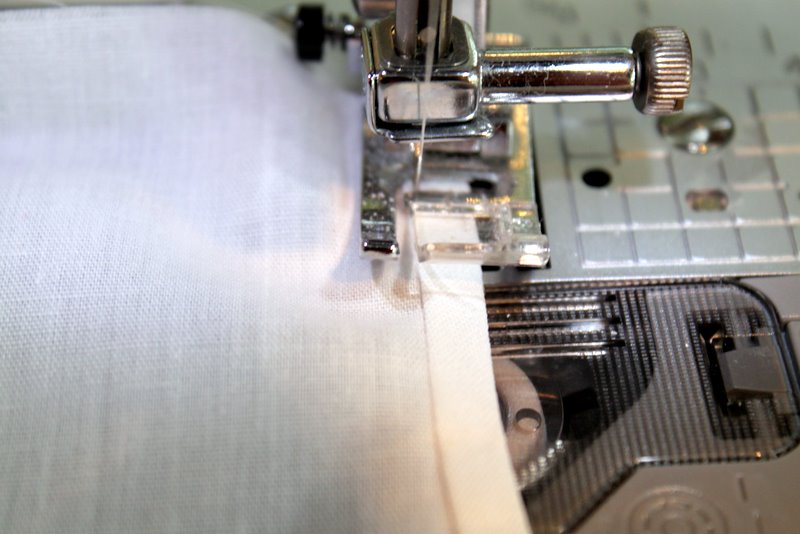
Stitch in the fold along the raw edge of both the bias tape and the garment.  Sew on the right-side of the garment.


Here (picture above) is what your bias tape will look like once you have stitched in the fold towards along the side with the smaller fold.


Next fold your bias tape over to the other side (wrong-side of the garment).  If you notice in the picture above, the bias tape on the underside is ever so slightly wider than the top.  This is exactly what you want.


Now stitch as close to the edge of the bias tape as possible on the top side (smaller fold).  Stitching on this side will ensure that you will catch the larger fold (on the other side) and have perfect looking bias tape every time!  Important to note:  You stitched your original line of stitching on the right-side of the garment and you are doing your second set of stitching on the same side (right-side) of the garment.


Here is what your bias tape will look like once it is sewn into place.

I used the double-fold bias tape technique on this vintage pillowcase dress arm hole.  Using this method, I have no trouble sewing perfect bias tape every time!


You can use bias tape to encase any raw edge of a sewing project or simply use it to add a pop of color and style.  Try it on the bottom edge of a skirt, the bottom of a dish towel for some added decorative detail, or on the edge of a pocket. 

Single-fold bias tape works very similarly to double-fold.  The only difference is that when you fold over your bias tape to the wrong-side of the garment there will be nothing left on top (you won't see the bias tape from the right-side of the garment).  Instead you will just see a line of stitching on the fabric where you have sewn your single-fold bias tape to the wrong-side of the garment.  Personally I find double-fold bias tape to be easier and have a cleaner, more finished look, but use whatever your pattern or design calls for.

Once you master sewing bias tape, you will feel like you have come along way as a beginning sewer.  Honestly, I used to dread sewing bias tape, but now it is a piece of cake!  Don't let bias tape scare you, it can be a lot of fun and I will show you how to add your own special flare to projects in Sew Basics: Bias Tape (part 2).

Cottage Mama's Note:  If you have any questions, please email me at thecottagemama@gmail.com and I am happy to help.  We have lots of fun talking "sewing" over on The Cottage Mama facebook page, so come on over and join in the fun!

Happy Halloween


Happy Halloween from The Cottage Home!  
Hope you all have fun trick-or-treating with your little pumpkin heads - I know we will!!

Halloween Costumes for Couples

Happy Halloween... Are you looking for last minute Halloween costumes for couples? Here are some great ideas. Since I am such a huge fan of 30 Rock, my favorite couple has to be Liz Lemon and Jack Donaghy!
If you are a Glee follower, you may want to go as Rachel Berry and Finn Hudson.
Go for the Glam, and dress up as Katy Perry and Russell Brand.
photos: glamour.com
Be safe and have a Happy Halloween...

More Entertainment and mo
re ways to follow BB&B

Saturday, October 30, 2010

Modern Minimalist Kitchen Furniture Italian Design

This is a new style of kitchen furniture by Aran Cucine.This Kitchen Cabinet Design Very Beatiful with black color.Kitchen Furniture Design with modern style in black and clean the floor looks.This Kitchen Furniture is Perfect suitable to Minimalist House.

Modern Minimalist Kitchen Furniture
Modern Minimalist Kitchen Furniture Italian Design

Modern Bedroom Interior Design with Lighting Fixtures

This is Modern Bedroom Interior Design with Lighting Fixtures and Luxury LCD TV.This Bedroom Interior Design that Suitable for your minimalist home design.Very comfortable design for LCD TV.

Modern Bedroom Interior Design with LCD TV

Modern Bedroom Interior Design with Lighting Fixtures

Modern Bedroom Interior Design

Best of the Week on BB&B

It's the weekend... and Halloween weekend at that! What are you going to be?
We want to see where you "hang out"...
bare legs vs hose
Enjoy these links from this week on BB&B and around the web.
Are you a BB&B Facebook Fan?
Color Inspiration: Black and White and
Holiday Entertaining: Candy Apple Red or Black
Bright Ideas: Using Mirrors and Fall Foliage ~ a new watercolor painting
A very exciting new line up for BB&B
DIY fun projects for this weekend...
and the year's biggest pumpkin set world record ... You have to see this!
For fashion inspiration: sequins and gunmetal
a vintage little owl.. and cool fingerless gloves in black...
Fun from the archives: Are you a salty or sweet lover? Bare legs or hose?

More ways to follow BB&B

Thursday, October 28, 2010

Two Little Pumpkin Heads


I feel so relieved that the girls Halloween costumes are complete.  I went back and forth for several weeks try to decide what they were going to be, but could not decide.  Finally, I took the girls to the fabric store and let Savannah decide. 

I pulled out the Simplicity Halloween costume book and she said she wanted to be a pumpkin.  Perfect!  Not the most creative costume idea, but definitely a classic.  I mean really, how long will they let you dress them up as pumpkins?  Not long, I suppose.

So here is the pattern we settled on.


Today was Savannah's ballet class and they were all supposed to dress up in their costumes.  Not wanting to make Matilda feel left out, I dressed her up too.


Here are my two little pumpkin heads waiting for Savannah's class to begin.  They are looking and acting more and more like sisters these days.  I love it!  I have to admit that the idea of having two little ones 16-months apart scared me in the beginning, but I am realizing more and more that it is actually quite a blessing.

After Savannah went into class, I had to snap a few pictures of my littlest pumpkin head.  She does not like to wear hats (unlike her sister), so I made sure to put a ribbon tie on her little hat.


Here's Miss Matilda thinking about trying to take her hat off.  The ribbon tie worked, she kept her hat on!


After ballet class was over, I took the girls to a local pumpkin patch to take a few more pictures of them in their costumes. 


I have a hard time following patterns exactly.  It's probably the same reason I have trouble following recipes.  I always like to make it my own by putting my own spin on it.  I turned this costume into more of a pillowcase dress, drew my own faces, and changed up the hat a little bit.  I do, however, think patterns are wonderful for help with sizing and inspiration.


The main fabric is orange fleece and the black, green and tan are all felt.  I love working with fleece.  It's so easy to sew and you don't have to worry about serging or finishing the edges.  Not to mention the fact that this costume will be warm and toasty trick-or-treating in the cool October air.


I just love these two little pumpkin heads!

Cottage Mama's Note:  This costume was very simple to sew - perfect for beginners!  If you have not made your child's costume yet, you could probably get this done in about an hour or two.  So if you have an hour to spare, go for it!

A New Line Up on BB&B

Hello everyone! I want to thank my loyal followers of Bright Bold and Beautiful, and if you are new, welcome! Your visit to BB&B means so much, and I want your experience to be exciting and resourceful every day. The new weekly line-up will include the following, with other inspiration sprinkled in between.
Winter Wonderland II - watercolor painting
Monday starts the week with Monday Inspiration followed by a Fabulous Giveaway! Tuesday will be your day to find Color Inspiration {such as paint colors} for your interior design ideas. Wednesday will be filled with Bright Ideas from Holiday Decorating to DIY and Home Renovations. Tune in on Thursdays for Etsy Finds and Fashion galore, and feast your eyes every Friday with Beautiful Living! If you missed anything, Saturday has the re-cap with Best of the Week and Sunday is saved for Entertainment and Celebrity fun.
Abstract - Trees - Watercolor Painting
The Bright Bold and Beautiful newsletter, out this November 1st, features recipes, Etsy seller discounts, and a winner for the acrylic knobs. So sign up by entering your e-mail in the box. {center column} Be sure to confirm your subscription in the follow up e-mail. The winner will be chosen October 31st, so sign up today!
Abstract - Watercolor Painting
And last but certainly not least, thank you to all of my sponsors. Bright Bold and Beautiful is growing by leaps and bounds, and if you would like to promote your shop for the holidays, please contact me. Bright Bold and Beautiful receives over 40,000 views per month.
My competitive rates are for
etsy sellers, small businesses, crafters, and bloggers.
Come join the fun and get noticed on BB&B!
New work by Laura Trevey - Fine Art Watercolor Paintings
More Bright and Beautiful Art and
More ways to follow BB&B

Wednesday, October 27, 2010

Fall Foliage Riverview - Watercolor Painting

Fall Foliage Riverview - Original Watercolor Painting
"Fall Foliage Riverview" available for purchase in my Etsy shop.
New work by Laura Trevey - Fine Art Watercolor Paintings
More Bright and Beautiful Art and
More ways to follow BB&B
Don't forget to enter the fun giveaway!

Bright Ideas: Using Mirrors

Sparkling light reflects off the chandelier crystals and two large mirrors.
I need to add this gorgeous image to my list of "Bright Ideas: Using Mirrors".
This room is the definition of elegance.

Tuesday, October 26, 2010

Holiday Entertaining: Candy Apple Red {or Black...}

Halloween is in the air around here... Spooky Candy Apples ...
Which would you like... Red or Black?
These would be so fun to have on the table for your Halloween party!
Click here for the recipe.
More holiday decorating ideas and mo
re ways to follow BB&B
Candy apples via Coco+Kelley via The Hive